🎨 How to Easily Change Sizes and Shapes in Procreate
Want to adjust your art in Procreate with ease? These are the tools and tricks I use every day. Check out the full video with voice-over for a step-by-step guide—it’s super helpful!
You’ll get the best results if you explore all the options Procreate offers, but here are my go-to tips:
🔄 Basic Workflow
Want to adjust your whole artwork? Tap the arrow tool.
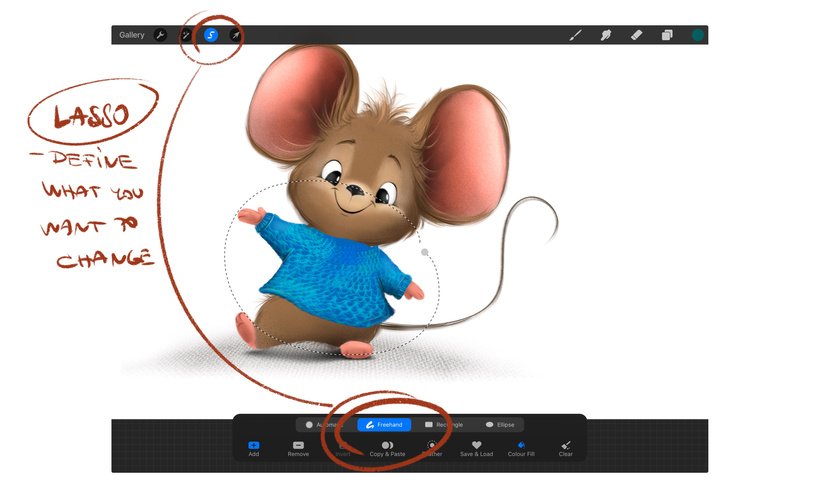
Want to change just part of your art? Use the lasso tool to circle the section first. Use the Freehand option for loose drawing or another option for precise shapes.
💡 Pro tip:
If your artwork is spread across multiple layers and you want to move them together without merging:

Just slide right on each layer you want to select.
To deselect them, slide right again.
Bonus tip: Be better than me and Name your layers—you’ll thank yourself later!
✏️ Transformation Modes (Arrow Tool)
Freeform – Allows you to stretch and resize freely.
✨ Hold the blue node for a moment to activate perspective mode!Uniform – Keeps your artwork’s proportions and ratio intact.

Distort – Shift your artwork from various angles and perspectives.
Warp – Bend and shape your artwork in multiple directions.


✨ My Favorite: Liquify Tool
Go to: Magic Wand → Liquify → Push
I use this daily! It gives you super precise control over your adjustments. The effect depends on the brush size, so you can make changes even in very tiny spots.

🎯 Tip: Liquify includes many movement modes—explore them all to find your favorite!
⏪ Reset Tool
Made a mistake? If you’re still in the arrow tool mode, you can use Reset to undo all changes.
⚠️ But beware: Tapping another tool or re-selecting the arrow tool will disable the reset option!
🎁 More tips!
👉 If you’re curious about canvas sizes, DPI, RGB, and how to set them up correctly, check out this post!
💬 Did this help you?
Drop your thoughts in the comments—I’d love to hear what tools you use the most!

Leave a Reply
Want to join the discussion?Feel free to contribute!