Counting Pages Like a Pro (The Secret Behind Book Structure)
This post was meant to continue our talk about the overlooked pages of a book (the first part was all about the bio pages) — but then I realized I should probably give you a clue about where those pages actually sit in the book’s structure. So here we are! 😄
I originally started preparing this post for my lovely patrons from the Let’s Make Children’s Books tier, but I decided to give everyone a little taste! (It turned out super long for just one post — I’ve included lots of real examples! 📚✨)
Maybe some of you are just starting your illustrator’s journey, and I know there are so many questions and tricky parts along the way. And how to count pages correctly when making a children’s book, it’s something that often confuses beginners and very often also authors! (Then we’ll dive into the second part of Overlooked Pages of the Book.)
How Page Counting Works
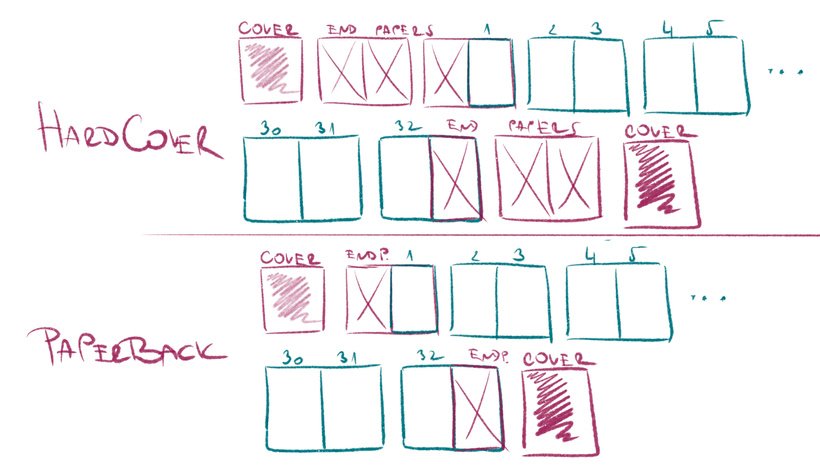
For now, let’s stick to the inside of the book (and the way we read — from left to right). In my template, I’ve also indicated the covers, but only for counting purposes. Covers — and what “hardcover” vs. “paperback” really mean, with all the tiny nitty-gritty details — will be a topic for another post. There’s a lot to say! 😄
There can be slight nuances depending on the publisher or the type of book, but this structure is very common. Inside the book, page 1 always starts on the right-hand side, and the last page ends on the left. Here’s a little sketch to help visualise it.
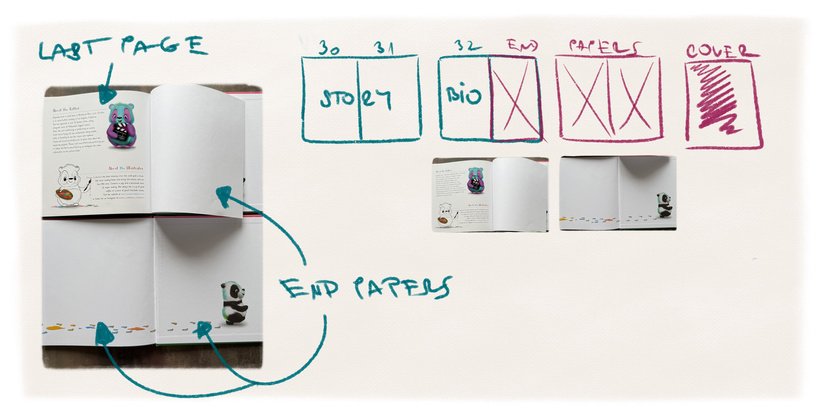
Note: Endpapers (or endsheets) are the pages glued to the cover insert in the case of a hardcover book. On a paperback, they’re simply the inner sides of the cover.
We don’t count these as part of the book’s numbered pages.
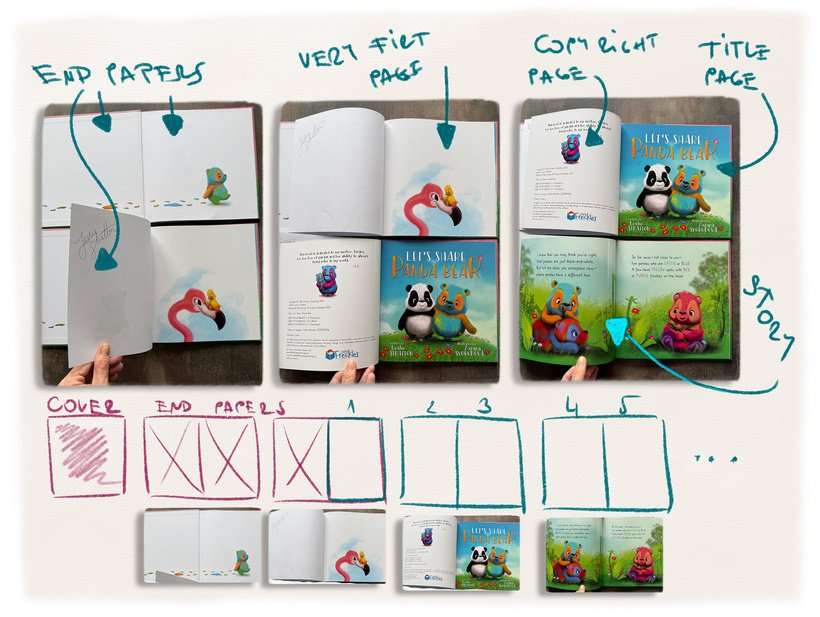
I’m also including a real book example, because let’s be honest — real examples are always much better than just doodling! :)))
This is a real example of Hardcover.
You can also guide the author through this process — because if both of you understand the real book structure, you can avoid a lot of mess later. 😅
Authors need to know that they should count at least four extra single pages beyond the story itself when planning. So it means, for example for 32-pages book, you have 14 spreads (important word = two single pages together) + 4 additional pages.
This is a very common example — of course, there’s always room for playing around and adjusting the layout, but I wanted to give you a good starting point for understanding the basic principles. 😊
Useful tips:
The total number of pages in your book should be a multiple of 8 or 4. (Depends on the printer, for example, Amazon KDP requires the number of pages to be divisible by 4.)
If you’re preparing a book for self-publishing on Amazon, the minimum number of pages for a paperback is 24. That’s the lowest acceptable count, but I recommend 32 pages — it feels more like a real book rather than a catalogue, especially if the author prints on lighter paper stock. But of course, it depends on your of author’s budget.
Overlooked Pages of the Story
If you want to dive into those additional and often forgotten pages — the ones that can make a huge difference between good design and great design — check it out right here and make your children’s book even better! 💛 Because there are actually more options than you might think.
If you enjoy this sneak peek and want to explore the process of creating a children’s book in more depth, feel free to switch your subscription and join me on the full creative journey. 💛 Don’t worry, you can change it any time, up or down or jump back as a free member!
Let’s chat!
I know, this was a lot of information, so don’t hesitate to ask if you have any questions or thoughts!


Leave a Reply
Want to join the discussion?Feel free to contribute!