The Best Size of Canva for Drawing

What’s the best size of Canva for drawing? This is a question I get asked a lot!
📍There are a few things to keep in mind before setting up the right canvas size. I won’t go into super technical details—I’ll keep it simple and easy to follow :)
How and Where to Create a Custom Canvas
I use Procreate, but you can set up a custom canvas in most digital drawing apps. The steps are usually very similar.
A Few Tech Terms (but nothing scary!)
Dimensions:
You can set these in millimeters, centimeters, inches, or pixels. I usually work in inches because I create illustrations for children’s books, so I need to match the size of the pages or spreads.
If I’m just drawing for fun—like character designs or sketches—I go for a square format. Totally up to you! The most important thing is: What will you use your artwork for? That brings us to the next important term:
DPI (Dots Per Inch)
If you’re only sharing your art online or on social media, you don’t really need to worry about DPI. Just pick a size (square or rectangle) and go for it.
But if you’re planning to print your artwork—like making prints, posters, or putting it in a picture book—you need to pay attention to DPI:
DPI affects how sharp and detailed your printed image will be.
The standard for print is 300 DPI.
You’ll be okay with anything above 150, but 300 is best.
I usually go for 340 DPI, just to make sure every little detail is crisp and clean.
🌟 Even if you’re only sharing your art online now, I recommend setting your DPI to 300 just in case you decide to print it later. You’ll thank yourself later!
💡Useful formula if you need to convert inches to pixels: Pixels = Inches × DPI. For example: 4 inches × 300 DPI = 1200 pixels
Maximum Layers
You’ll see this info when setting up your canvas. It tells you how many layers you can use on that specific canvas.
💡 Important to know: Higher DPI + larger canvas = fewer layers available
The number of layers also depends on your iPad’s memory. So if you’re buying an iPad and you’re serious about illustration, I recommend getting one with more storage. You’ll get more layers to work with.
Color Profile
Another important setting, but super easy:
RGB – Best for digital art (what you see on screens)
CMYK – Best for printing (used by printers)
I usually work in RGB, even for art that might be printed later. It’s more vibrant and gives you a wider range of colors, which looks amazing on screens.
When I’m ready to finalize artwork for print (like for a book), I convert it to CMYK—but that’s a whole other topic I’ll cover in a future post for those you are really interested in book illustration 👩🎨
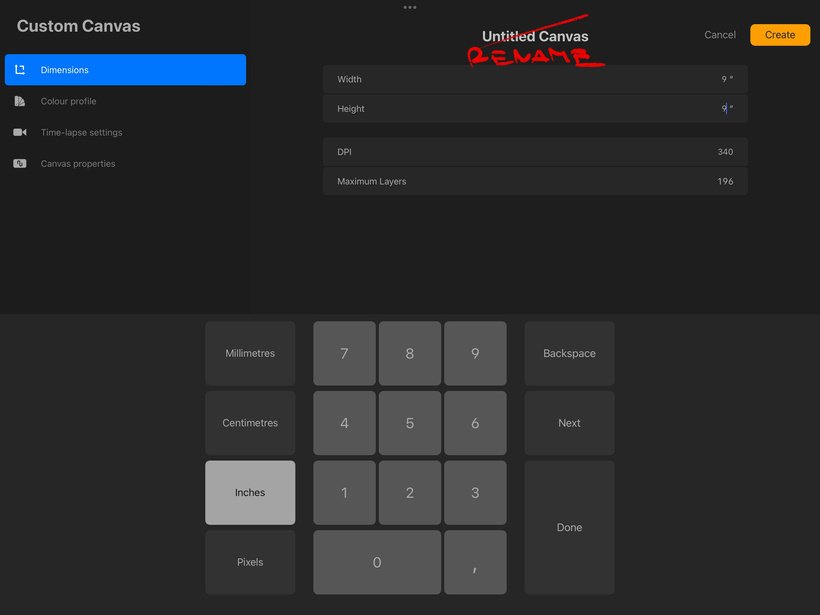
Pro Tip: Rename Your Canvas
💡Once you’ve set everything up, rename your canvas to save time next time you draw, you can just pick it from the list.
My Go-To Settings:
Size: 9 x 9 inches
DPI: 340
Color profile: Display P3 or RGB
💬 Hope this was helpful, let me know in the comments if you have more questions about this topic.
*These tips belong to Little Art Club Tier, so if you want to learn other tricks and tips, jump right in there 💕.
Leave a Reply
Want to join the discussion?Feel free to contribute!